")
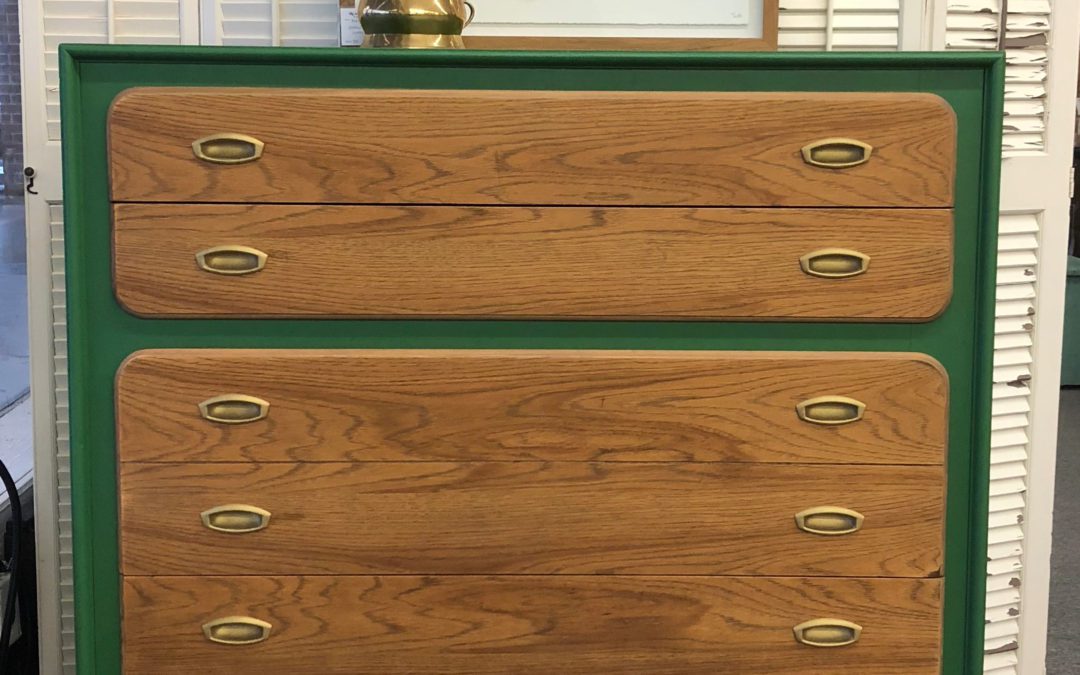
Last year I was at a flea market and ran across this chest. It was beat up. It had graffiti written on the top. I think a dog had chewed on one of the drawers. But there was something about it that cried out to be restored. So it sat in my garage for months. Don’t judge. Other pieces came and went and really, I was waiting for the right time… and the inspiration to finish her. So inspiration came this week. I wanted a way to highlight the cool rounded drawers. So yesterday I got to work.


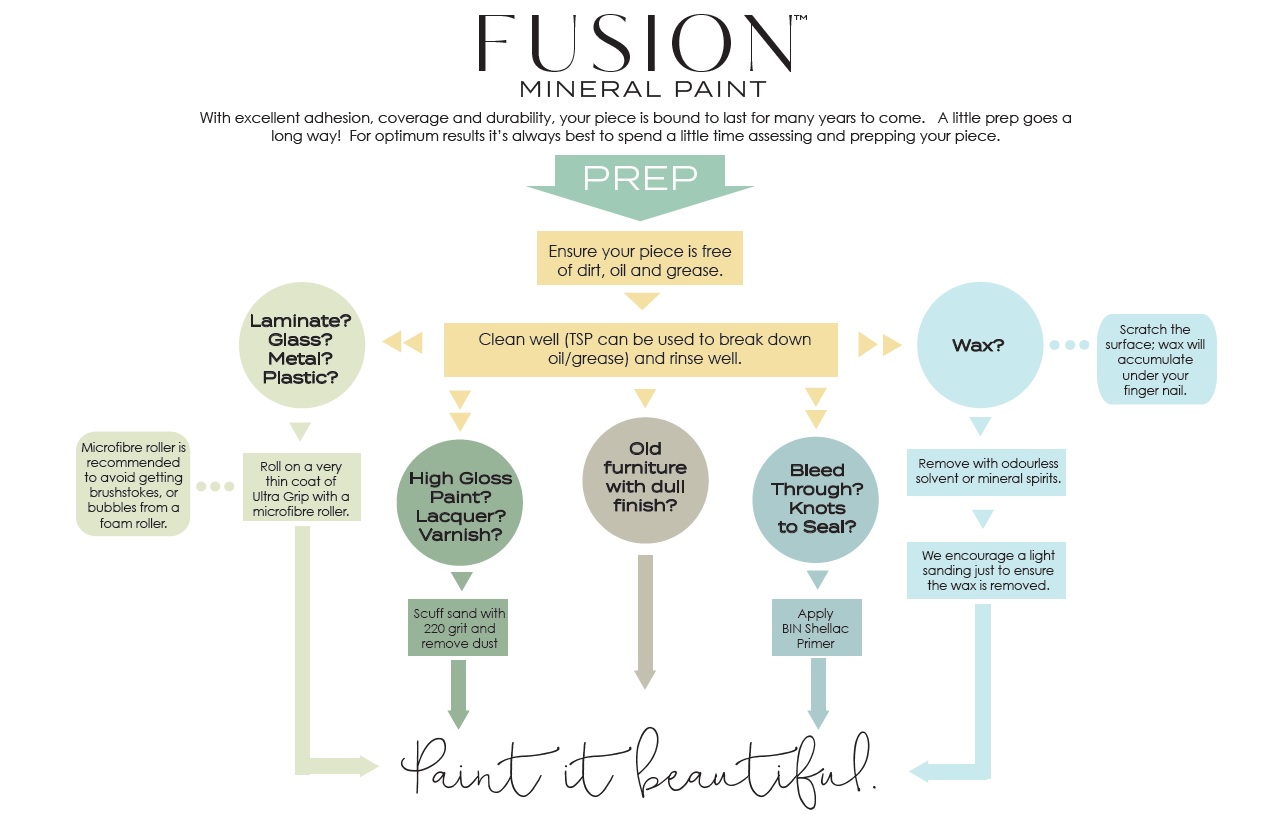
Like every project, I started off by cleaning her off with TSP. I mix the concentrate with water and keep it in a spray bottle. I just spray it on and wipe down with paper towels, repeating until the paper towels are clean. Then I sanded the top down. I needed to remove fingernail polish, permanent marker, and try to smooth out some scratches.

I decided to paint her in Park Bench. It’s such a yummy, happy green! Since she’s a mid-century modern (MCM) piece, I wanted the finish to be clean and crisp. So, I opted to roll the paint on with a microfiber roller. If you’ve never used a roller, they’re really fabulous and make quick work on large, flat surfaces. First thing you need to do is prep the roller. I roll it over a piece of box packing tape to keep loose fuzzies from getting into my paint. Our paint kit includes a roller tray, roller handle with microfiber roller, paint brush, sand paper, and shop towels so it’s a great all-in-one kit for projects. I like to line my roller tray with foil to help clean up be minimal. I quickly rolled on one coat of paint.


So have you ever known you should do something but went ahead without doing it? And then you regretted it?? Yep, me too! This piece had a large scratch on the top. I thought about filling it but decided to paint anyway. Well pain’t just not going to fill a scratch. So I decided to do it right and fill it with Bondo. I’ve only used Bondo a time or two but I do like the way it fills better than wood putty. You have to mix the filler with a drying agent and then work quickly as it dries quickly. I got it filled and then sanded it smooth.


After patching the scratch, I came back in with two more coats of paint. I could have saved myself a coat of paint if I had just patched first and then painted! Another lesson learned! I used a small brush to paint the areas that the roller wouldn’t fit.
Once I had the body painted, it was time to turn attention to the drawers. They were in sad shape too. We stripped and sanded in preparation for staining. Stripping is much easier than you would think. I brush the stripper on with a cheap chip brush, let it sit, and then scrape off the gunk with a plastic putty knife. It took about 3 coats to get all of the old finish off. Then I used steel wool with mineral spirits to remove the last remnants of stripper. I gave the drawers a quick sand with 180 grit paper to prepare the wood to receive the stain. I didn’t want the wood to be dark so gave the drawers a coat of Natural Stain and Finishing Oil. I like to tip the can over on an applicator pad and use the applicator pad to apply the stain. I always get a great finish this way. You just have to be sure that you don’t leave excess on the surface.


While the drawers were drying, I turned my attention to the legs. I wanted to put a touch of gold bling on the dresser. I decided to paint the legs gold. I gave them a coat of Prairie Sunset paint and then two coats of Pale Gold metallic paint. It turned out more yellow than I wanted. So I mixed up a custom mix of about 6 parts Pale Gold, 1 part Brushed Steel, and 1 part Bronze to get a different shade of gold. After putting two coats of the new gold over the old gold, I decided that was more the look I wanted!
Next, it was time to turn my attention to the hardware. I loved the inset cup pulls but wanted to enliven their color. Did you know you can paint hardware? It’s not hard at all. For these, they needed a good cleaning first. I used Krud Kutter (mostly because my TSP was out in the garage and I didn’t want to walk out and get it). I used a course brush to scrub off the years of grime. I wanted to make sure the paint would stick to the metal, so I gave all of the hardware a coat of Ultra Grip. I used a sponge brush to help apply a very thin coat. Once dried (12 hours), I gave them two coats of my new gold paint.


She was coming along quite nicely. Because she’s a MCM piece, I wanted the paint finish to be slightly glossy, so the final step was to give her a quick wet sand and apply a clear coat. I LOVE to wet sand Fusion Mineral Paint. It gives it a soft, buttery feel. I just spray some water on the paint and lightly sand with 600 grit paper. I’m not trying to take paint off, just smooth the surface. Once that was done, I wiped one a coat of Natural Stain and Finishing Oil. While I don’t think this piece needs any extra protection, I used it to provide a soft sheen.


Now the only thing left to do was put her back together. Hardware was reattached, drawers were put back in, and she began to smile. This one was so worth the effort! I’m in love and I think she’s happy!
